
The Google DNS, better known as the Google DNS, are DNS addresses whose function is limited to speeding up the loading of web pages in those systems where they are established correctly. As we already explained in this other article, the functions of DNS addresses are intended to translate the IP addresses of each of the web pages that we visit through our devices. Much of the loading speed of a web page depends entirely on the speed of the DNS, and currently Google DNS is the best in this regard.
A few minutes ago we showed you how to repair a damaged flash drive from Windows 10 . A few days ago we showed you 5 Windows 10 features that can improve the performance of your laptop . This time we will show you how to configure Google DNS in Windows 10, Windows 8 and Windows 7.
Advantages of using Google DNS in Windows 10
In addition to speeding up the loading of most Internet web pages, Google DNS have a higher degree of security , as they have a more secure encryption than the rest of the DNS used by most telephone operators, in addition to servers delocalized that in no case will reveal our real location in case of tracking.

As for the increase in speed, its main reason for being is largely due to the caching of Google’s DNS as it has a database of a large number of web pages . This, added to the location of Google’s server destinations in Spain and the rest of the world, helps the loading of the pages to be much more fluid than the DNS of Movistar, Orange, Vodafone, Lowi, MásMóvil and the rest of the companies. .
List of Google DNS DNS updated to 2019
Google currently has four public DNS addresses that depend on the protocol used in the Internet connection:
Google DNS for IPv4 addresses
- 8.8.8.8
- 8.8.4.4
Google DNS for IPv6 addresses
- 2001:4860:4860::8888
- 2001:4860:4860::8844
How to change Windows 10 DNS to Google DNS
To change the DNS addresses of our Windows 10 computer to the Google DNS, the first thing we will have to do is go to the Network and Internet section within the Windows Control Panel . Nothing from Windows Settings.
Next, we will click on Network and Sharing Center and select the name of our current network , either WiFi or Ethernet, to right-click on it and click on Properties in the context menu that will appear next to the network.
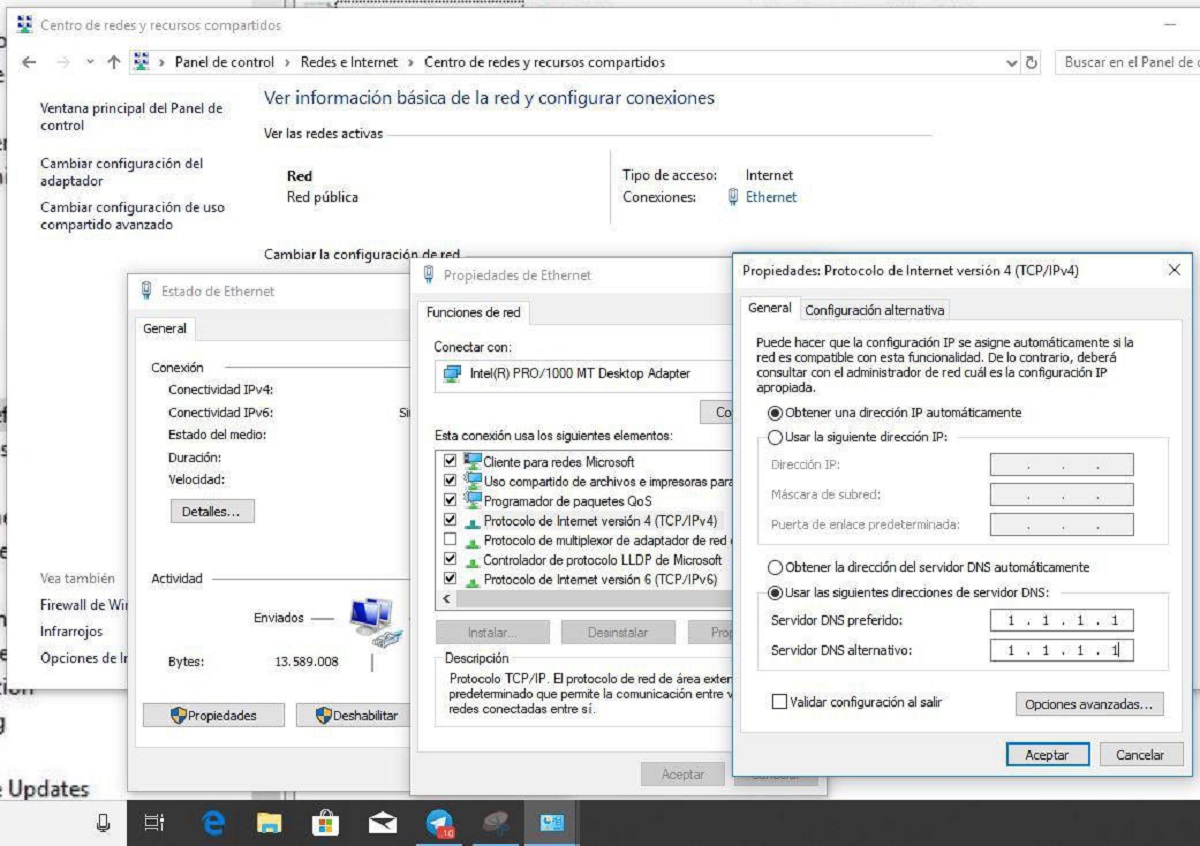
The next step to change Windows DNS to Google DNS will be to select Internet Protocol version 4 (TCP/IPv4) and right-click again on the option in question to select Properties.
Finally, we will activate the Use the following DNS addresses box and we will write in the two boxes that will appear below the Google DNS detailed above. Since in both boxes we will have to write the same IP address, the ideal would be to write the following addresses:
- Preferred DNS server: 8.8.8.8
- Alternate DNS server: 8.8.8.8
O well:
- Preferred DNS server: 8.8.4.4
- Alternate DNS server: 8.8.4.4
Once we have specified the corresponding addresses, we will give Accept and then Apply so that the configuration is applied correctly in Windows. From now on the loading speed of web pages will increase significantly.