The Mac’s printing system is quite robust. In most cases, it is very easy to install printers and scanners with just a few clicks. Even older printers that do not have current printer drivers can be installed using a manual installation process. But despite the simple setup process, there may be times when something goes wrong and your printer no longer appears in the Print dialog, no longer appears in the Printers & Scanners preferences pane, or is listed as and nothing you do will return it to an online or inactive state.
First, try the usual printer troubleshooting methods:
- Check if there is ink/toner and paper in the printer.
- Turn your printer on and off.
- If it is a USB printer, unplug it and plug it back in.
- Use Software Update or the App Store (in the Apple menu) or visit the printer manufacturer’s website to see if there are newer versions of the printer software or drivers available.
- Remove and reinstall the printer in Printers & Scanners preferences.
If you’re still having problems, it might be time to try the nuclear option: delete all system components, files, caches, preferences, and other printer details and start fresh.
Fortunately, OS X includes an easy way to restore your printing system to a default state, just as it was when you first turned on your Mac. you need to successfully install or reinstall a reliable printing system on your Mac.
Restart the printing system
Before you begin the reset process, remember that this is the last option to troubleshoot a printer problem. Resetting the printing system will remove and delete quite a few items; specifically, the reset process:
- Deletes all print queues and all print jobs that might be inside the queues.
- Resets all printer settings to factory defaults.
- Delete all printer preference files.
- Perform a permissions reset on the /tmp directory on your Mac.
- Remove any printer or scanner that was previously added to the Printers & Scanners preferences pane.
Reset the printing system in OS X Mavericks files (10.9.x) or later
- Launch System Preferences by selecting it from the Apple menu or by clicking its icon in the Dock.
- Select the Printers & Scanners preferences pane .
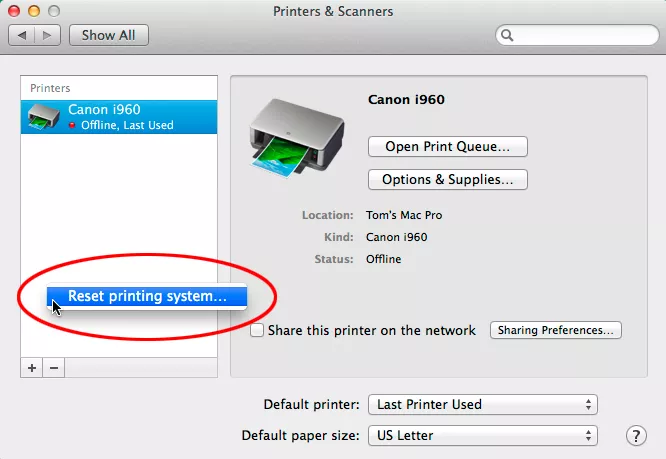
- In Printers & Scanners preferences, place your cursor in an empty area of the printer list sidebar, then right-click and choose Reset Printing System from the pop-up menu.
- You will be asked if you really want to restart the printing system. Click the Reset button to continue.
- You may be prompted for an administrator password. Provide the information and click OK .
The printing system will restart.
Reset the printing system in OS X Lion and OS X Mountain Lion
- Launch System Preferences by selecting it from the Apple menu or by clicking its icon in the Dock.
- Select the Print & Scan preferences pane .
- Right-click a blank area in the printer list sidebar, and then select Reset Printing System from the pop-up menu.
- You will be asked if you really want to restart the printing system. Click the OK button to continue .
- You may be prompted for an administrator password. Provide the information and click OK .
The printing system will restart.
Reset the printing system in OS X Snow Leopard
- Launch System Preferences by selecting it from the Apple menu or by clicking its icon in the Dock.
- Select the Print & Fax preferences pane in the System Preferences window.
- Right-click on the printer list (if no printers are installed, the printer list will be the leftmost sidebar) and select Reset Printing System from the pop-up menu.
- You will be asked if you really want to restart the printing system. Click the OK button to continue.
- You may be prompted for an administrator password. Provide the information and click OK .
The printing system will restart.
What to do after restarting the printing system
Once the printing system is restored, you will need to re-add any printers, fax machines, or scanners that you want to use. The method for adding these peripherals is slightly different for each of the different versions of OS X we’ve covered here, but the basic process is to click the Add (+) button in the printer preferences pane, and then , follow the instructions on the screen.
More detailed instructions for installing printers can be found at:
- The easiest way to add a printer to your Mac
- Manually install a printer on your Mac
The two guides mentioned above were written for OS X Mavericks, but should work for OS X Lion, Mountain Lion, Mavericks, Yosemite, or later.
To install printers on versions of OS X earlier than Lion, you may need printer drivers or installation applications provided by the printer manufacturer.