Time Machine, Apple’s popular backup application, isn’t limited to working with backup volumes that are physically attached to your Mac. It supports remote backup drives in the form of network drives, including Apple’s own Time Capsule product.
Network-based Time Machine volumes are very useful. Having your backup drive in a remote location, physically isolated from your Mac, protects your backups in case your Mac has a catastrophic failure.
Another wonderful use for remote Time Machine volumes, such as Time Capsules or NAS (Network Attached Storage), is to allow multiple Macs to back up to a single central location.
Of course, network-based Time Machine volumes have their own problems; one of the most common is the failure to mount the backup volume on your Mac. This prevents Time Machine from accessing the remote volume and typically results in the following error message:
The backup volume could not be mounted
There are variations of this error message that you may encounter, including:
Backup disk image could not be mounted
This error message and its variations are very descriptive, letting you know if the problem is likely with the remote backup volume. Correcting the problem is usually easy; I’ve outlined the most likely causes below.
Can:
It may seem obvious, but make sure the Time Capsule or NAS is turned on and all the appropriate indicators are on.
Network connection:
If you’re having trouble with a Time Capsule or NAS, make sure they’re available on your network. If you’re using a wireless network, you can check your basic Wi-Fi connection with Use Wireless Diagnostics App to Fix Your Mac’s Wi-Fi Issues.
Please refer to the manual of the NAS device for instructions on how to confirm that the device is present on the network. For Apple’s Time Capsule, do the following:
-
Start Airport Utility, which is located in the /Applications/Utilities folder
.
-
AirPort Utility will search for Apple wireless devices, including a Time Capsule. If Airport Utility shows your Time Capsule, then it’s turned on and accessible to your Mac. If you don’t see your Time Capsule on the screen, try turning it off and on again. If you still can’t access your Time Capsule, you’ll need to try resetting it to factory defaults. Instructions on how to do this can be found in the Time Capsule Setup Guide.
Incorrect password:
Time Capsule and most NAS products require a password to be provided before the network drive is installed on your Mac. If the password automatically supplied by Time Machine to your Time Capsule or NAS is incorrect, the message “The backup volume cannot be mounted” error. This is the most common reason for seeing this error message.
It usually means that the administrator of the Time Capsule or NAS changed the password and forgot to update all the information for Time Machine users. If that’s the case, you can return the Time Capsule or NAS password to its original state from the last time Time Machine worked, or update the password on your Mac.
To update your Mac password, follow these instructions:
Reselect Time Machine Backup
-
Sign in to your Mac with an administrator account
-
Start System Preferences by clicking the System Preferences icon in the Dock or by choosing System Preferences from the Apple menu
.
-
Select the Time Machine preferences pane in the System Preferences window
.
-
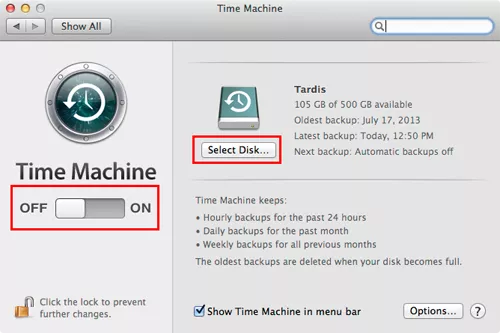
Disable Time Machine by clicking the Disable slider
.
-
Click the Select Disk button
.
-
Find the Time Capsule or NAS drive, select it as the Time Machine volume, and provide the correct password
.
-
Turn Time Machine back on.
-
You should now be able to perform backups.
-
If you are still having problems, you can try changing the password that is stored in your keychain.
Change keychain password
-
Turn off Time Machine
-
Start Keychain Access, located in /Applications/Utilities
.
-
In the Keychain Access dialog, select System from the list of keychains in the sidebar
.
-
Locate the keychain entry whose name begins with the name of your Time Capsule or NAS. Example: If your Time Capsule’s name is Tardis, its keychain name will be Tardis.local or Tardis._afpovertcp._tcp.local.
-
Double-click the keychain entry for your Time Capsule or NAS
.
-
A window will open displaying various attributes of the keychain file
.
-
Click the Attributes tab, and then check the Show Password box. Provide your admin password to authenticate your access
-
Your Time Capsule or NAS password will appear
.
-
If the password is not correct, enter the new password in the Show Password field, then click Save Changes
.
-
Exit Keychain Access
-
Turn on Time Machine.
You should now be able to successfully perform a Time Machine backup to your Time Capsule or NAS.