If you’re using one of the major RPM-based distributions like Fedora or CentOS, you might find the GNOME package manager a bit of a pain to use.
Debian, Ubuntu and Mint users already know that the best tool for installing software is not the software center.
The main problem with the Ubuntu software center is that it doesn’t return all the results that are available in the repositories and sometimes it’s hard to actually see what is available. There are too many ads for packages that can be purchased.
Command line users will use apt-get because it provides direct access to all available repositories and the results are correctly filtered when searching for a package name or package type.
However, not everyone is happy with using the command line and the intermediate solution is to use the Synaptic Package Manager.
The Synaptic Package Manager is not particularly pretty but it is fully functional, providing all the features of apt-get but doing it in a more graphical and visual way.
Fedora and CentOS users who are using the GNOME desktop environment have access to the GNOME Software Installer.
Like the Ubuntu Software Center, this software is a bit unwieldy. From a CentOS user’s point of view, it annoys me that it says “Queuing” or “Downloading Packages” and it takes ages to do so. Quite often the queues are caused by a version of packagekit that is already running and if you try to install via Yum it tells you about the other process which you can easily kill.
Fedora and CentOS command line users will use Yum to install software in the same way that Ubuntu users will use apt-get and openSUSE users will use Zypper.
A graphical equivalent of Synaptic for RPM packages is Yum Extender which can be installed using the GNOME Software Installer.
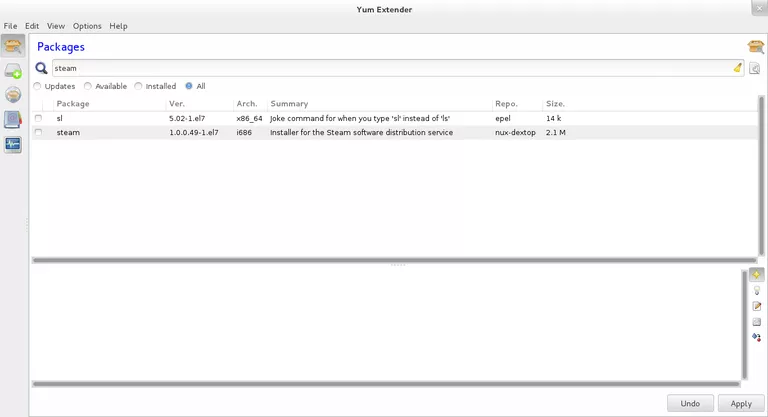
The current YUM Extender interface is basic but fully functional and you will find it easier to use than other tools.
The easiest way to find what you’re looking for is to simply search for it by entering the app name or app type in the search box.
There are several radio buttons below the search box, as follows:
- updates
- Available
- installed
- Everyone
- groups
- Categories
You can filter all of your search results by any of these items.
The default option when you first load Yum Extender is to show all available updates and you can install them by checking the boxes and clicking Apply. If you have a lot of updates, selecting them individually may not be the best option, so you can select all of them by clicking the Select All button.
The position of the buttons is a bit out of sight, so you may not notice them right away. They are located in the lower right corner of the screen.
Selecting the available option without any search criteria lists all the packages available in the selected repositories while the all option shows all the packages that can be installed
If you want to see a list of all packages installed on your system, select the installed radio button.
The Groups option displays a list of categories as follows:
- Applications
- System
- Databases
- desktops
- Developing
- High availability
- MATT desk
- sturdy storage
- servers
- system management
- Virtualization
- Web services
If groups show categories, what does the categories option show?
The categories option allows you to select by size or repository. So if you only wanted software from the rpmfusion-freeupdates repository you can simply select that option and a list of packages for that repository will appear.
Similarly, if you’re looking for a small screenshot tool, you can choose to search by size which groups packets in the following sizes:
- 0 – 100KB
- 100KB – 1MB
- 1mb – 10mb
- 10mb – 50mb
- 50+mb
When you’re searching, the default search options are by:
- Name
- Summary
- Description
By clicking the magnifying glass next to the search box, you can change these options. For example, you can disable searching by name, abstract, and description, or you can add architecture as a search option.
When searching for an app, the group and category selection buttons disappear. This happens because groups and categories are more for browsing than searching. To make them appear again, you have to click on the little paintbrush icon at the end of the search box to remove the filtering.
When searching for packages or groups and categories, a list of packages will appear in the lower window and the information returned by default is as follows:
- package name
- Version
- Architecture
- Summary
- Repository
- File size
Clicking on one of the packages brings up a description in the bottom panel. The description usually contains a lot of text and a link to the project website.
Next to the description of the package there are 5 icons that change the information that appears in the lower panel:
- show description
- Update information
- Package changelog
- Pack list of files
- package dependencies
On the left side of the screen there are 5 icons that perform the following functions:
- Perform actions on packages
- Work with pending actions
- Select active repositories
- See Yum’s story
- view output
By the way, all of these options are reflected in the View menu at the top of the screen.
Active repositories lists all available repositories from which you can install the software. To activate them, place a check mark in the box.
In the edit menu option you can choose to edit the preferences. Options you can change include loading a list of packages on startup, looking ahead, checking for updates automatically, and using sortable columns. There are also more advanced preferences available.
Finally, there is the options menu that allows you to choose whether to show broken packages or not (also available in preferences), show only the latest ones, no gpg check, and clean up unused requirements.