Screen sharing on the Mac is a delight. With Mac screen sharing, you can communicate and help fix a problem, show a remote family member how to use an app, or access a resource that isn’t available on the Mac you’re currently using.
Set up screen sharing on your Mac
Before you can share your screen on a Mac, you must turn on screen sharing. Full instructions can be found in the following guide: Share your Mac screen – Share your Mac screen on your network
Okay, now that you’ve enabled screen sharing, let’s move on to how to access a remote Mac’s desktop. There are numerous ways to connect to a remote Mac, and you’ll find a list of the different methods at the end of this manual. But in this guide we are going to show you how to use the Finder sidebar to access the desktop of a remote Mac.
Using the Finder sidebar to access screen sharing has many benefits, such as not having to know the IP address or name of the remote Mac. Instead, the Mac remote shows up in the Shared list in the Finder sidebar; accessing the Mac remote control only takes a few clicks.
The drawback of the Shared list in the Finder sidebar is that it is limited to local network resources. You won’t find a long-distance friend’s or family member’s Mac listed here. There is also some question about the availability of any Mac on the Shared list. The Shared list is populated when you first turn on your Mac, and again when a new network resource is advertised on your local network. However, when a Mac is turned off, the Shared list sometimes doesn’t update to show that the Mac is no longer connected. This can leave ghost Macs on the list that you can’t connect to.
Aside from the occasional Mac ghost, accessing remote Macs from the sidebar is our favorite way to make a connection.
Configure the Finder Sidebar to access a remote Mac
The Finder sidebar includes a section called Shared; this is where network shares appear.
If your Finder windows don’t currently display the Finder sidebar, you can make the sidebar visible by selecting “View, Show Sidebar” from the Finder menu. (Note: You must have a Finder window open to see the Show Sidebar option on the View menu.)
Once the sidebar is displayed, you should see a section called Shared. If not, you may need to set Finder preferences to display shares.
- Open a Finder window and select ‘Preferences’ from the Finder menu.
- Click on the Sidebar icon.
- In the Shared section, place check marks next to Connected Servers and Bonjour Teams. You can also select Back to My Mac, if you use that service.
- Close Finder Preferences.
Using the Finder Sidebar to Access a Remote Mac
Open a Finder window.
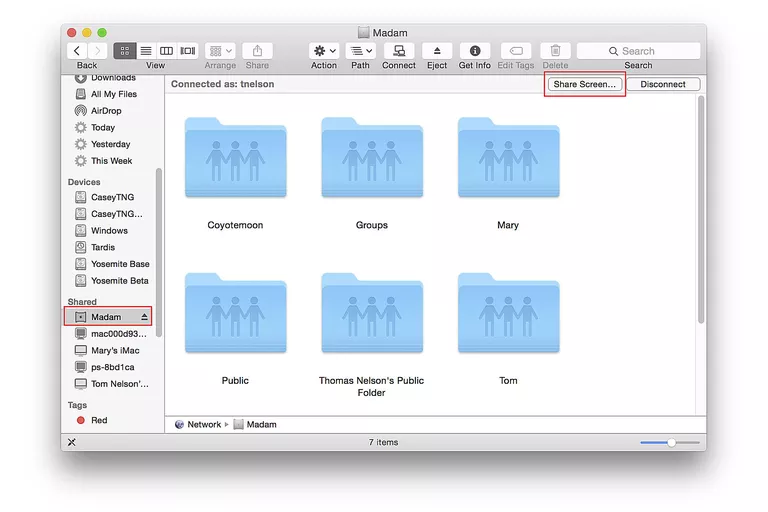
The Shared section of the Finder sidebar should display a list of shared network resources, including the destination Mac.
- Select the Mac from the Shared list.
- In the main pane of the Finder window, you should see a Share Screen button. There may be more than one button, depending on the services available on the selected Mac. We’re only interested in sharing your screen, so click the Share Screen button.
- Depending on how you’ve set up screen sharing, a dialog box may open asking for a username and password for the shared Mac. Enter the necessary information, and then click Connect.
- The remote Mac’s desktop will open in its own window on your Mac.
Now you can use the Mac remote as if you were sitting right in front of it. Move your mouse over the remote desktop on your Mac to work with files, folders, and applications. You can access everything available on the remote Mac from the screen sharing window.
Exit screen sharing
You can exit screen sharing by simply closing the share window. This will log you out of the shared Mac, leaving the Mac in the state it was in before you closed the window.