Disk Utility’s First Aid feature can check the health of a drive and, if necessary, perform repairs on the drive’s data structures to prevent minor problems from becoming major problems.
With the arrival of OS X El Capitan, Apple made some changes to how Disk Utility’s First Aid feature works. The main change is that First Aid no longer has the ability to check a unit regardless of its repair. Now when you run First Aid, Disk Utility will check the selected drive and if any errors are found, it will try to fix the problems automatically. Before El Capitan, you could run the Verify process yourself, and then decide if you wanted to try making repairs.
First Aid Disk and Boot Drive
You can use Disk Utility First Aid on your Mac’s startup drive. However, in order for First Aid to perform any repairs, the selected volume must first be unmounted. Your Mac’s startup drive can’t be unmounted since it’s in use, which means you’ll need to boot your Mac from another startup device. This can be any drive that has a bootable copy of OS X installed on it; Or, you can use the Recovery HD volume that OS X created when it was installed on your Mac.
We’ll walk you through how to use Disk Utility First Aid on a non-boot volume, and then how to use First Aid when you need to repair your Mac’s startup volume. The two methods are similar; the main difference is the need to boot from another volume instead of the normal startup drive. In our example, we’ll use the Recovery HD volume that was created when you installed OS X.
First aid with an uninitialized volume
- Start Disk Utility, located in /Applications/Utilities/.
- Since you probably use Disk Utility from time to time, I suggest you add it to the Dock to make it easier to access in the future.
- The Disk Utility window appears as three panes. At the top of the window is a button bar that contains commonly used functions, including first aid. On the left is a sidebar that shows all the mounted volumes connected to your Mac; to the right is the main panel, which displays information on the currently selected activity or device.
- Use the sidebar to select the volume you want to run First Aid on. Volumes are the items just below the parent name of a device. For example, you might have a Western Digital drive listed, with two volumes below it called Macintosh HD and Music.
- The right pane will display information about the selected volume, including its size and the amount of space used.
- With the volume you want to check and repair selected, click the First Aid button on the top panel.
- A drop-down sheet will appear asking if you want to run First Aid on the selected volume. Click Run to start the verification and repair process.
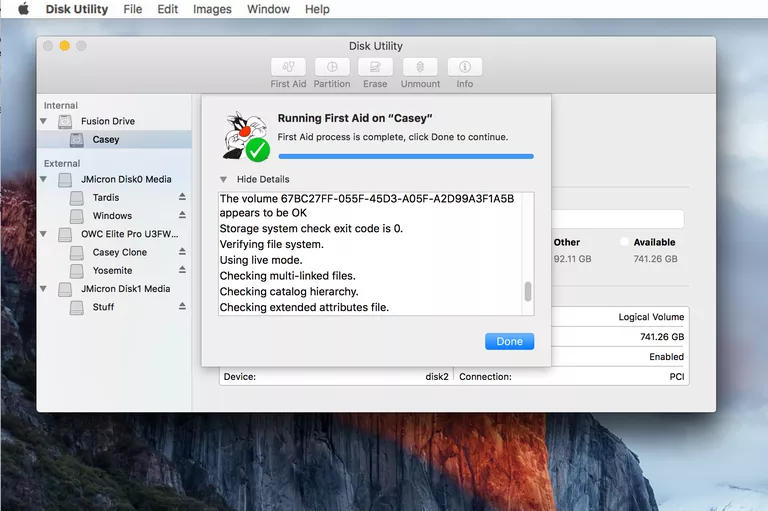
- The foldout sheet will be replaced with another one showing the status of the verification and repair process. It will include a small disclosure triangle at the bottom left of the sheet. Click on the triangle to show the details.
- The details will reveal the steps that are being taken in the verification and repair process. The actual messages displayed will vary depending on the type of volume being tested or repaired. Standard drives can display information about catalog files, catalog hierarchy, and multilink files, while Fusion drives will have additional items that are checked, such as segment headers and checkpoints.
- If there are no errors found, you will see a green check mark at the top of the spreadsheet.
If errors are found, the repair process will start.
drive repair
Some notes on what to expect when using First Aid to repair a drive:
- If First Aid reports that the drive appears to be okay, or that the drive has been repaired, you are done. In some previous versions of First Aid, it was necessary to run the repair process multiple times to ensure that the repairs were complete; that is no longer necessary.
- If First Aid displays an “overlapping extension assignment” error, Disk Utility will create a Bad Files folder at the root level of your startup drive. The overlap error indicates that two (or more) files occupied the same location on the drive being repaired. It is very likely that both files have been corrupted, but there is a small chance that you may be able to recover one or both.
- You can browse the files in the Corrupted Files folder. If you don’t need the file, or can easily recreate it, I strongly recommend that you delete it. If you must have the file, then check your backup to see if you have a usable copy.
- If First Aid reports, “The underlying task reported failed,” this indicates that First Aid failed to make the necessary repair. However, he does not give up; try to repeat the repair several times.
- If the repair is unsuccessful and you have a backup of all data stored on the affected drive, I recommend reformatting the drive and performing a clean install of OS X. You can then restore the data from the backup with the Migration Assistant.
First aid on your home drive
Disk Utility First Aid has a special “live mode” that you will use when you run it on the boot drive. However, you are limited to only performing a drive check while the operating system is actively running from the same disk. If an error is found, First Aid will display an error, but will not attempt to repair the drive.
There are a couple of ways around the problem, so you can check and repair your Mac’s normal startup drive. Methods include booting from the OS X Recovery HD volume or another drive that contains OS X. (Please note Note: If you’re checking out a Fusion Drive, you must boot with OS X 10.8.5 or later (I recommend using the same version of OS X that’s installed on the current startup drive.)
Boot from the recovery hard drive
You’ll find complete step-by-step instructions on how to boot from the Recovery HD volume and start Disk Utility in our guide: Use the Recovery HD volume to reinstall OS X or fix Mac problems.
Once you have successfully booted from the recovery hard drive and started Disk Utility, you can use the above method to use First Aid on a non-boot drive to check and repair the drive.
Additional guides that can help with drive problems
- How to use the secure boot option on your Mac
- How can I repair my hard drive if my Mac won’t boot?