While trying to start your computer normally or recovering it using a recovery tool, you may see this ” Error Code 0xc00000e ” on your screen. This problem occurs when the BCD gets damaged on your system. There are a variety of reasons why this problem can appear, but disk writing problems and corrupted system files can be one of them. But there is nothing to worry about. Just follow our instructions line by line and the error will be gone in a few minutes.
Solution 1: remove external drives
Any external drive can cause confusion in the boot priority of your system. Therefore, separating them can help you.
1. First, press and hold the power button for 15 seconds to ensure that the system completely shuts down.
2. Now carefully remove, separate the system from the power supply.
3. After that, remove all external drives from your system (including external hard drives).
4. There should be no CD / DVD in the disc drive.
5. Once you have done all of this, simply connect the power cord to your system and turn it on.
6. Now, press the power button on your machine to start it up.
Since the BIOS will not find other drives according to the boot priority, it will boot from the system drive.
Restart your system several times and check if this solves your problem.
Solution 2: rebuild the system boot configuration data
Corrupt system boot configuration data can lead you to this ‘Error code 0xc00000e’. Therefore, you must rebuild the boot configuration data.
1. At first, completely turn off your system.
2. Then switch your system ON again .
C. Once your system is starting up, simply press and hold the power button again to force a shutdown of your system.
D. Simply repeat this action 1 or 2 more times, and for the third time, let your computer start normally.
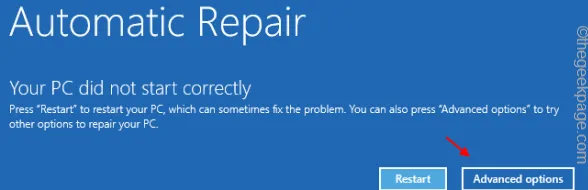
Your system will automatically go into ‘Automatic Repair’ mode.
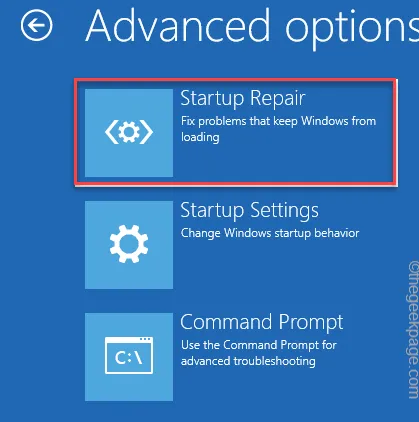
1. Once the Automatic Repair screen appears, touch the ” Advanced options ” button.
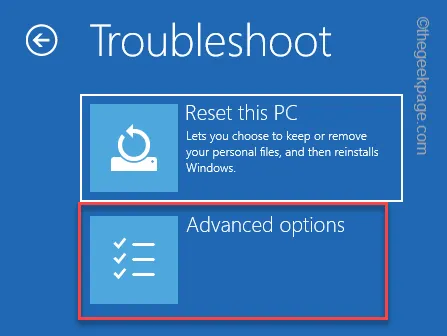
2. To solve the problem, touch the ” Troubleshoot ” button .
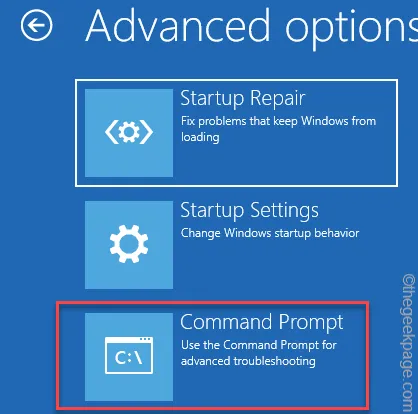
6. After that, you need to tap on the « Advanced options ».
7. Among various options, tap on the « Command Prompt » to access the command prompt.
Wait a moment for your system to start the terminal.
9. Simply select your administrative account and click ” Continue ” to finally have access to the terminal.

11. Now, paste these three commands one by one and hit Enter . This will fix the Master Boot Record.
bootrec / fixmbrCopy
bootrec / fixbootCopy
bootrec / scanosCopy
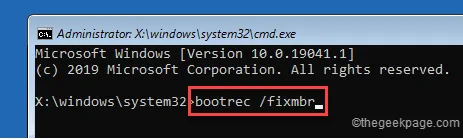
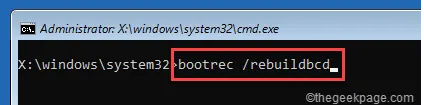
12. After this, you can rebuild the startup configuration directory on your system. Just run this code to do it.
bootrec / rebuildbcdCopy
Once you have done this, exit the terminal and your system will boot to the screen you have noticed earlier.
13. Then tap « Continue “.
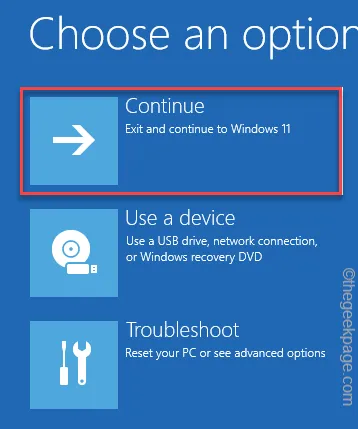
Let your computer start normally. Then check if you are still facing the problem or not.
Solution 3: modify the boot priority
Misconfigured boot priority can cause your system to boot from the wrong device, which can ultimately lead to the error ” Error Code 0xc00000e “.
1. First, turn off your system.
2. After turning it off, press the power button once to turn it on.
3. When the manufacturer’s logo appears, press and hold the ” Delete ” button on your keyboard to access BIOS setup.
NOTE –
You must be aware of the exact key to access the system BIOS, which may differ from one manufacturer to another.
Generally, these are the most used keys:

3. Now, go to the ” Boot ” tab.
4. Then select the « Configure boot options « using the arrow keys and press Enter to access it.
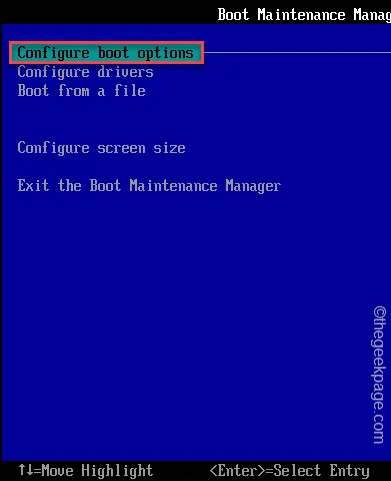
5. Then, scroll down to the « Change boot order « and press the Enter key to open it.

5. Here, you will notice that the list of boot devices (like – HDD / SSD, CDROM drive, network, USB devices) are present.
6. Simply use the arrow key to select the HDD / SSD drive (containing the Windows folder) and move it to the top.
7. Once you’ve done that, scroll down to select the ‘ Commit changes and exit ‘ option and hit Enter .
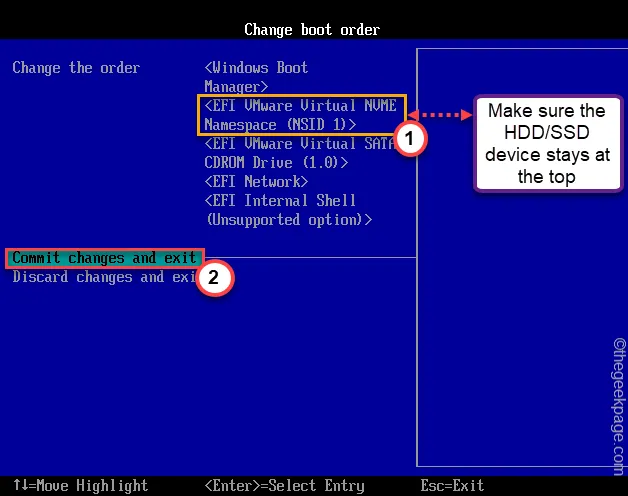
8. Finally, press the ” F10 ” button to save this setting.

Wait for your system to reboot normally. It will start according to the startup priority.
Solution 4: use startup repair
There is a built-in startup repair tool that you can use to fix this problem.
1. Start your system in automatic repair mode.
2. Once you are there, click on ” Advanced options “.
3. To solve the problem, touch the ” Troubleshoot ” button .

4. After that, you should touch the « Advanced options “.
5. Now, tap on “ Startup Repair ” to start the automatic repair process.