With the file version history under Windows 10 you can wonderfully perform an automated data backup of your data. Microsoft has already introduced the technology of file version history with Windows 8 and 8.1 and further improved it with Windows 10. The technique of the file version history is based on the shadow copies or previous versions .
File version history means that Windows automatically performs backups of your data. USB data carriers , network shares , NAS systems, etc. are possible as backup targets . All you have to do is configure the file history settings correctly and select the appropriate drive. Please make sure that there is enough free space on the backup drive.
You can then specify exactly which directories should be backed up when configuring the file versions . By default, most directories are backed up from your Windows user profile, such as the documents folder, favorites, downloads and many more. You can see exactly how this works and how you can add to the list of data to be backed up in the article below.
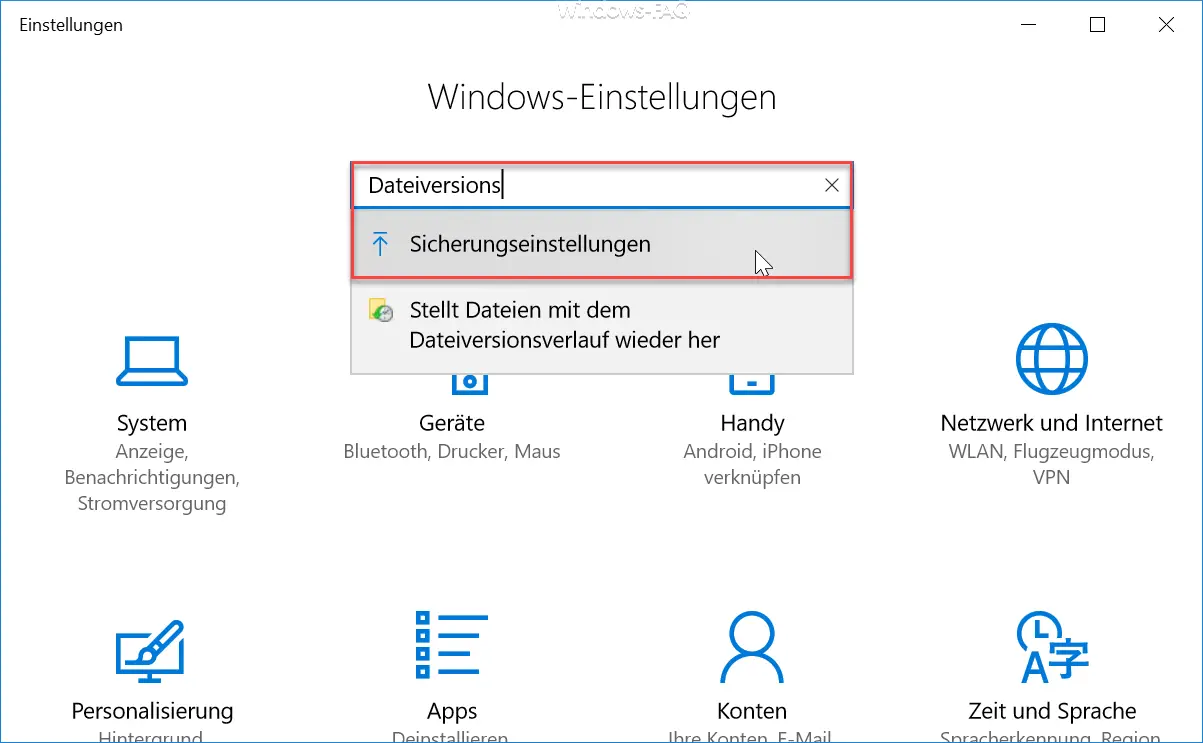
In the past, it was only possible to set the file version history settings using the Windows Control Panel, but these setting options have also been incorporated into the Windows 10 Settings app. The easiest is the key combination

to press and enter ” file version history “. Afterwards the point ” Backup Settings” is suggested, under which all necessary file version history settings are hidden.
Then the window for the ” Backup Settings” or ” Backup ” appears. There is also the point
Save with file version history
Microsoft explains this function as follows:
Back up your files to another drive so you can restore lost, damaged, or deleted original data.
After you have set the ” Automatically save my files ” slider to ” On “, you have to switch to the ” Further options “.
You can then make numerous settings in the new window.
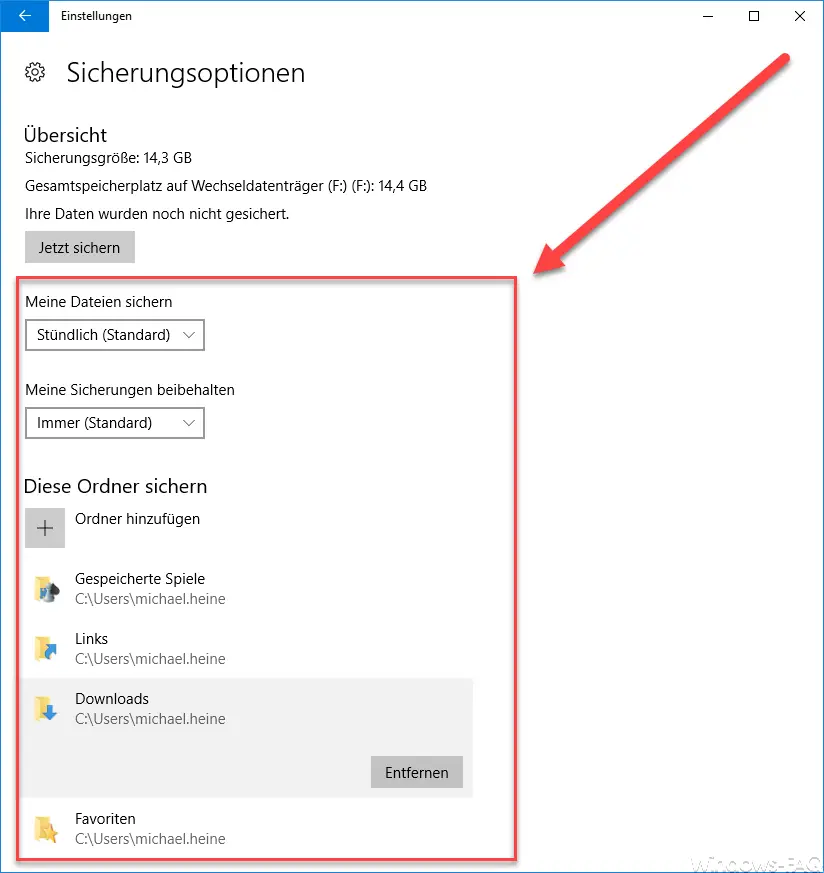
First you can save how often the Windows backup should be carried out. By default it is set to ” Hourly “, but there are many other time setting options. Under the setting option ” Keep my backups ” you can then determine whether and how long old backups should be saved. Here you can select various values from 1 month to 2 years or also set that old backups are only overwritten if space on the data carrier is required.
With the button “Add folder” you can then add further folders that are to be saved on the backup data medium by the automatic file version backup. By default, the following folders are always backed up by the file version history.
- Saved games
- Left
- Downloads
- Favorites
- contacts
- Desktop
- 3D objects
- Searches
- Application data
- pictures
- Documents
- Own recordings
- Videos
- Saved images
- music
If you do not want to save one of the proposed folders, you only need to click on it once and then confirm ” Remove “.

Via the selection point ” Back up now ” you can then instruct Windows to perform the file version history backup . This is then indicated accordingly by ” Your data is being backed up … “.
Restore files from file history
If the file version backups run correctly and perform the backups at regular intervals, you can easily restore older files and folders. To do this, you simply have to click on the folder or file you want to restore in Windows Explorer and select the following option.
Restore previous versions
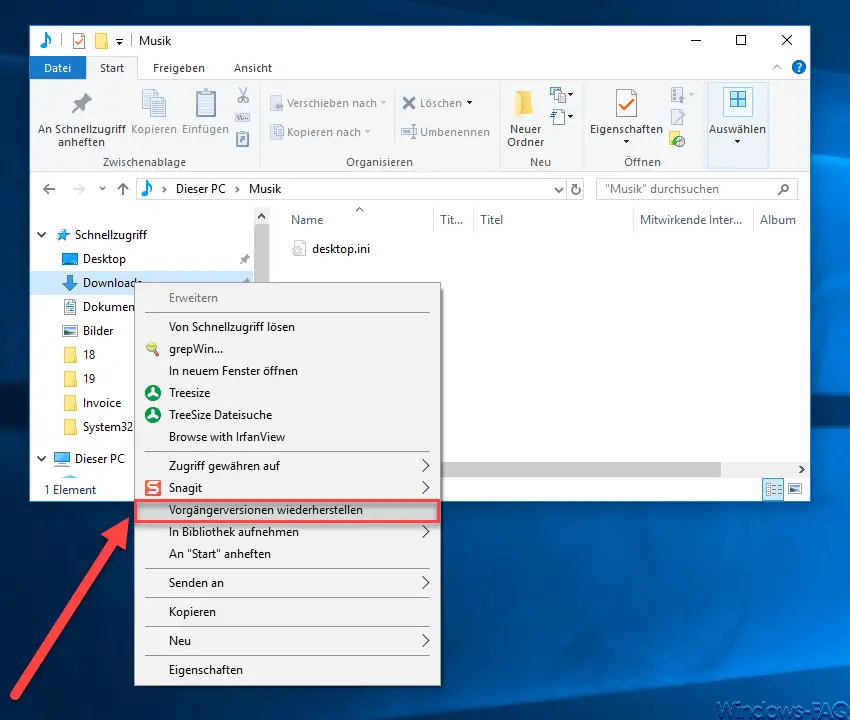
Then Windows Explorer shows you another window with the available backups. Now all you have to do is select the correct backup set . With ” Open ” you can then open the backed up folder and also restore parts of the backup. The entire object is then restored via “Restore” .
Conclusion on the file version history
Overall, it is a very successful function in Windows 10. We can only recommend to every user to set this up accordingly and to make a regular backup of his most important data. Good services come from WLAN NAS devices , on which you can then regularly save your data backups without any further action.
If you are interested in further information on the subject of “backup” or “data backup”, these articles may be interesting for you.
– Create a backup of the Outlook PST file
– Create a complete backup of the registry
– Create a backup of the group policies
– Backup Exec – Create an SDR disk – Part 1
– Backup Exec preparations for an SDR disk – Part 2
– Backup Exec – Create an SDR disk – Part 3