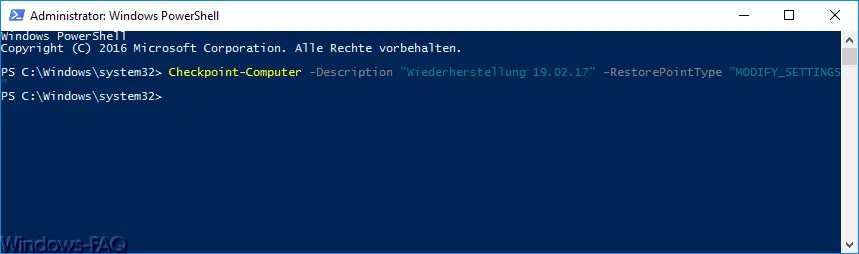
We already reported on creating a system restore point on Windows 10 yesterday . Today we would like to show you how this can be done very easily and quickly via Windows 10 PowerShell. It is important that you start a PowerShell window with administrator rights so that you can also create the restore point. The actual PowerShell command for creating is called
Checkpoint computer description “NAME OF THE RECOVERY POINT” -RestorePointType “MODIFY_SETTINGS”
You can see what it looks like in a live Windows 10 system here below.
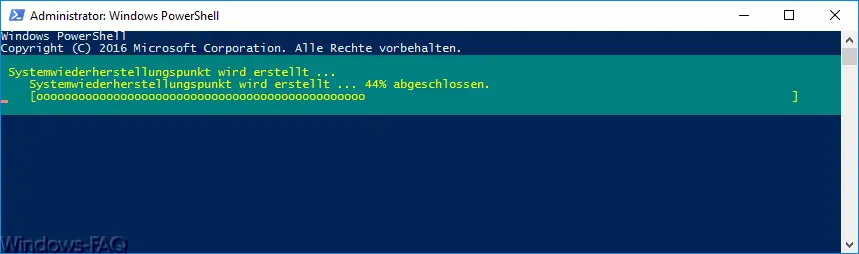
After confirming this PowerShell command , the restore point is created. This usually takes only a few seconds and is displayed in the PowerShell console as follows .
There are not many parameters with this command. After ” -Description ” you can enter a description under which name the recovery point should be saved. This can be very helpful if you have multiple recovery images and then want to choose the correct one when restoring. We explained in more detail how you can view all saved restore points via the PowerShell .
The ” -RestorePointType ” parameter specifies which type of restore point should be created. A distinction is made between the following types.
- APPLICATION_INSTALL
- APPLICATION_UNINSTALL
- DEVICE_DRIVER_INSTALL
- MODIFY_SETTINGS
- CANCELLED_OPERATION
The default value is ” APPLICATION_INSTALL “, as you can see in the PowerShell example above.
If you should receive the following error message when generating the Windows 10 system image , then you have not activated ” Computer Protection “, as we mentioned yesterday in our post (see link at the top of this post).
The error message is as follows:
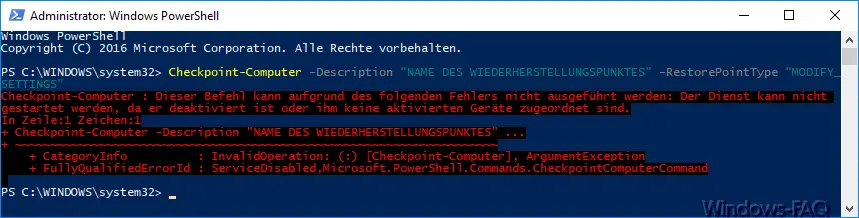
The exact error message is:
Checkpoint computer: This command cannot be executed due to the following error: The service cannot be started because it is deactivated or there are no activated devices assigned to it.
+ Checkpoint computer description “NAME OF THE RECOVERY POINT” …
+ ~~~~~~~~~~~~~~~~~~~~~~~~~~~~~~~~~~~~~ ~~~~~~~~~~~~~~~~~~~~~~~~~~~~~~~~
+ CategoryInfo: InvalidOperation: (:) [Checkpoint-Computer], ArgumentException
+ FullyQualifiedErrorId: ServiceDisabled, Microsoft.PowerShell.Commands.CheckpointComputerCommand
After you have activated Windows 10 computer protection, this message no longer appears and the restore points are generated correctly.
If you have more information about system recovery or data recovery, the following articles may be interesting for you.
– Delete system restore points and free up space
– Temporary files automatically delete Windows 10
– Data Recovery – Data Recovery by professionals
– system repair disc / recovery DVD Create Windows 10
– Deleted files under Windows Restore
– Data Recovery in Raid defect