Data backups are one of the most elementary tasks in IT. Without a current backup, there is always a risk of complete data loss . For this reason, we always point out how important backups are. But not only the implementation of data backups is important, the restoration or restoration of data or entire server systems must also be tested regularly. What good is an allegedly functioning backup if the restore does not work.
Restore an Exchange server
For this reason, we would like to demonstrate below how we can completely restore a Microsoft Exchange Server 2010 , which we back up with Veritas BackupExec (Symantec). For this purpose, we built a test environment that contains a complete domain controller (restore with UMOVE) and performed a full restore of the Exchange there.
The following steps are necessary for this.
- Since our Exchange runs as a VM, we have created an empty VM envelope on the Hyper-V server. This case is configured exactly like the original Exchange Server 2010.
- Then we made the backup files of the last full Exchange backup available to the BackupExec, which also runs in our test environment, and cataloged them in the BackupExec.
- The empty VM Exchange case must then be booted from the SDR disk. We have described in detail how you can create an SDR disk in 3 parts (SDR part 1, SDR part 2, SDR part 3). With us the SDR-ISO file was called ” CustomSDRImage0001 “. By default you will find this SDR file on your backup server in the directory ” C: Program Files Symantec Backup Exec sdr “.
Then the following points must be selected in order.
- Restore this computer
- The data resides on devices that are connected to a Backup Exec Remote Server.
- Backup Exec Server: RESTORE SERVER NAME
- Domain: enter the domain name if necessary
- : User USERNAME specify
- Password: PASSWORD specify
- Configure network adapter settings. Here you have to enter the IP addresses, the network mask, the DNS server and the gateway of the Exchange server.
- Load network adapter drivers
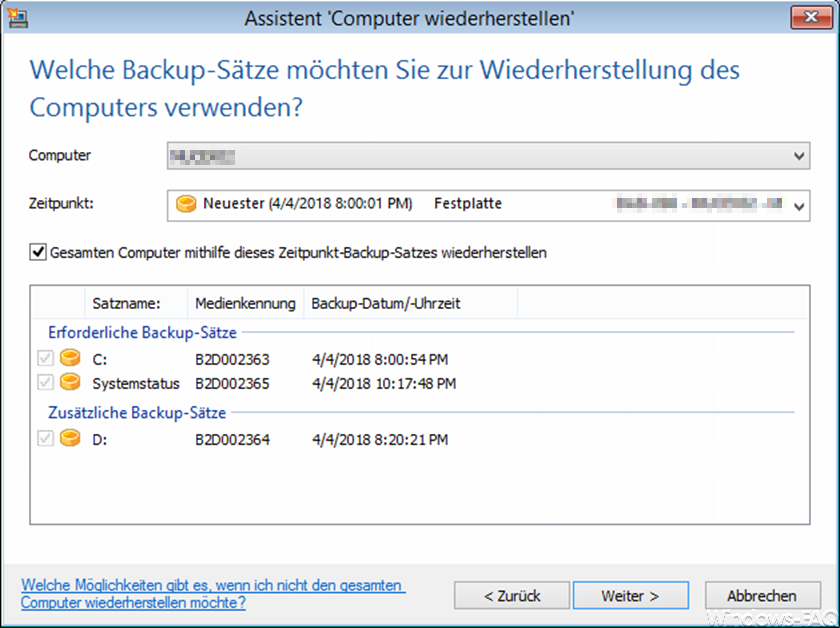
After the network information has been entered accordingly, the appropriate backup record for the Exchange Restore must now be selected. It looks like this.
Then the following questions from BackupExec should be answered as follows.
- Load storage controller driver
- Restore
- Restore duration: This can vary depending on the size of the backup files.
- Exit BackupExec
- Exchange Restore server restart
- Register as a USER with the appropriate rights.
Now a small problem begins, which we have found in the tests. After restarting the restored Exchange server, it did not have a network card. Although the latest Hyper-V integration services were already installed on the VM, the network card was not available. Only after a good 10 minutes did the message appear that a new device had been installed and that the Exchange Server had to be restarted. We then did this, but after that it took another 10 minutes until the network card was also visible in the NCPA.CPL.
However, the entire network configuration had to be set again in this case as the settings were not adopted.
Exchange has lost trust
After that, we restarted the restored Exchange Server and of course found that the Active Directory trust relationship had been lost. We then updated this on the Exchange server with the following command.
netdom.exe resetpwd / s: NAME OF THE DOMAIN CONTROLLER / ud: DOMÄNE USERNAME / pd: *
After ” ENTER ” the password of the specified user name must be entered and the trust relationship is active again.
 The Exchange itself was now correctly restored, but the Exchange Mailbox databases are still missing. These must be restored separately. Before that, however, we still have to tick the mailboxes in the Exchange management console that the databases may be overwritten during a restore. You can find these settings under
- Exchange admin center
- Microsoft Exchange on-premises
- Organization configuration
- P.O. Box
- For all mailboxes activate ” This database can be overwritten when restoring “.
Now you can create a restore job directly in BackupExec, which only backs up the Exchange databases. This works as follows.
- Restore in BackupExec
- Microsoft Exchange
- Microsoft Exchange Server databases or storage groups
- In the original location
- All transaction logs … ..
- C: Temp
- Yes, this is the last backup set to restore
- No tasks
The Exchange databases are now backed up and are immediately available after the restore job has been completed.
Conclusion of the Exchange Restore
We can only advise every admin to test an Exchange recovery in a test environment . There are sometimes problems that are not expected. We have performed this Exchange Restore process several times and are the most satisfied with the SDR solution. With these instructions, we can restore a complete exchange with several hundred mailboxes within 3-4 hours.
If you are interested in other Microsoft Exchange tips , take a look at the following articles.
– Set up email relay without authentication on Exchange 2010 – Error (0x8004020f)
– Exchange mailbox SecErr DSID-031520BB (INSUFF_ACCESS_RIGHTS)
– “(## KEY1) (## KEY2) (## KEY3)…” appears in ScanMail for Exchange (SMEX) login page or web console
– SP3 error while updating Microsoft Exchange 2010 (ID 1248 & 3776)
– query mailbox sizes
for Exchange 2010
– delete separate mailboxes for Exchange 2010 – Exchange “MapiExceptionCallFailed” database cannot be integrated
– mailbox export to PST Files on Exchange 2007
– Error installing Exchange 2010 admin center
– Exchange “New local move request” error