With the introduction of OS X Lion, Apple made fundamental changes to the way OS X is sold and distributed. Installation DVDs are history; OS X is now available as a download from the Mac App Store.
With the removal of installation DVDs, Apple needed to provide alternative methods for installing the operating system, repairing startup drives and system files, and reinstalling the operating system. All of these capabilities were previously available on the installation DVDs.
Apple’s solution was to make the OS X download contain an installer that not only installed the OS on your Mac, but also created a hidden volume on your startup drive called Recovery HD. This hidden volume contains a minimal version of OS X that is sufficient to allow your Mac to boot; also contains several utilities
.
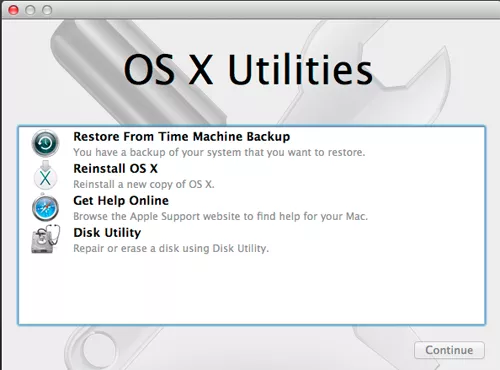
Utilities Included in the HD Recovery Volume
- Disk Utility – To repair damaged drives and system files.
- Safari – to allow you to connect and investigate any issues you may be having.
- Reinstall OS X – which can be used to install a fresh copy of the operating system on your Mac.
- Restore From Time Machine Backup – For those times when everything has gone wrong and you need to restore data from your backups.
- Terminal – For working with the Mac’s file system or editing files.
- Network Utility – In case you need to troubleshoot network issues.
- Firmware Password Utility – To set or remove firmware passwords, one of the security options for OS X.
As you can see, the Recovery HD can do much more than install the operating system. It provides almost the same services that were included on the old installation DVDs, just in a different location.
HD recovery volume access
Under normal operating conditions of your Mac, you probably won’t be aware of the existence of the Recovery HD volume. It does not mount to the desktop and Disk Utility keeps it hidden unless you use the debug menu to make hidden volumes visible.
To use the Recovery HD volume, you must restart your Mac and select Recovery HD as the startup device, using one of the following two methods.
Boot directly to the recovery hard drive
- Restart your Mac while holding down the command (clover) and R keys ( command+R ). Hold down both keys until the Apple logo appears.
- Once the Apple logo appears, your Mac boots from the Recovery HD volume. After a while (startup may take longer when booting from the recovery HD, so be patient), a desktop will appear with a window containing Mac OS X utilities and a basic menu bar at the top.
Reboot to Startup Manager
You can also restart your Mac with Startup Manager. This is the same method used to boot into Windows (Bootcamp) or other OSes you have installed on your Mac. There is no advantage to using this method; we include it for those of you who are used to using the startup manager.
- Restart your Mac and hold down the key.
- The bootloader will check all connected devices for bootable systems.
- Once the bootloader starts displaying icons for your internal and external drives, you can release the option.
- Use the left or right arrow keys to select the HD Recovery icon.
- Press the return key when the drive you want to boot from (the recovery HD) is highlighted.
- Your Mac will boot from the recovery hard drive. This process may take a little longer than a normal boot. Once your Mac finishes booting up, it will display a desktop with an open Mac OS X Utilities window and a basic menu bar at the top.
Using the recovery volume HD
Now that your Mac has booted from the Recovery HD volume, you’re ready to perform one or more tasks on the startup device that you couldn’t do while actively booting from the startup volume.
To help you, we have included the appropriate guides for each of the common tasks Recovery HD is used for.
Use disk utility
- In the OS X Utilities window, select Disk Utility , and then click Continue .
- Disk Utility will start as if you were using the application from your normal startup drive. The difference is that when you start Disk Utility from the recovery HD volume, you can use any of the Disk Utility tools to check or repair the boot drive. For detailed instructions, take a look at the following guides. Remember that if a guide asks you to start Disk Utility, you have already done so at this point.
- Using Disk Utility to Repair Hard Drives and Disk Permissions
- Format your hard drive using Disk Utility
- Backup your startup disk using Disk Utility
After you finish using Disk Utility, you can return to the OS X Utilities window by choosing Exit from the Disk Utility menu.
Get help online
- In the OS X Utilities window, select Get Online Help , and then click Continue .
- Safari will launch and display a special page containing general instructions on using the recovery HD volume. However, you are not limited to this simple help page. You can use Safari as you normally would. Although your bookmarks will not be present, you will find that Apple has provided you with bookmarks that will take you to Apple, iCloud, Facebook, Twitter, Wikipedia, and Yahoo websites. You will also find various news and popular websites bookmarked for you. You can also enter a URL to go to the website of your choice.
- Once you’re done using Safari, you can return to the OS X Utilities window by choosing Exit from the Safari menu.
Reinstall OS X
- In the OS X Utilities window, select Reinstall OS X , and then click Continue .
- The OS X installer will launch and guide you through the installation process. This process may vary, depending on the version of OS X being reinstalled. Our installation guides for recent versions of OS X will help you through the process.
- Update Install OS X Yosemite
- OS X Mavericks Installation Guides
- OS X Mountain Lion Installation Guides
- OS X Lion Installation Guides
Restore from Time Machine Backup
Restoring your Mac from a Time Machine backup will erase all data on the selected destination drive.
- Select Restore From Time Machine Backup in the OS X Utilities window and click Continue .
- The Restore Your System application will launch and guide you through the restore process. Be sure to read and follow the warnings in the Restore Your System app. Click Continue to continue.
- Follow each of the steps described in the System Restore application. When the process is complete, your Mac will restart from the destination drive you selected.
Create an HD recovery volume on another drive
The Recovery HD Volume can be a lifesaver, at least when it comes to troubleshooting and repairing problems with a Mac. But the Recovery HD Volume is only created on your Mac’s internal startup drive. If something were to go wrong with that drive , you could find yourself in a bind.
That’s why we recommend creating another copy of the recovery HD volume on an external drive or USB flash drive.